[Programmation] Petit projet Arduino
Répondre à la discussion
Affichage des résultats 1 à 13 sur 13

Petit projet Arduino


  1. #1
    invite9ddae0fb

    Petit projet Arduino


    ------

    Bonjour,

    sur un petit projet sur Arduino, je bloque sur un détail. J'ai mis le fichier .ino en pièce jointe.

    Lorsque j'appuie une première fois sur le bouton, la led s'allume et un relais se ferme (la lumière s'allume). Un deuxième appui lance un chrono (que je n'arrive pas à incrémenter à '-1000' au passage; l'incrémentation à '-1' fait que les centaines correspondent à une seconde, ce n'est sûrement pas un hasard), donc lance un chrono à l'issu duquel le relais s'ouvre, la led s'éteint et la lumière aussi.
    J'ai depuis des nuits plus sereine, il est maladif chez moi de m'endormir avec la lumière.
    J'essaie d'introduire une instruction 'break' dans ma boucle 'for' pour, soit interrompre le chrono, soit revenir au départ de ce chrono, soit avoir la lumière sans interruption, par un troisième appui du bouton. L'appui du bouton semble interférer avec le lancement du chrono (deuxième et troisième appui sont simultanés) et j'ai essayé de mettre un millis() avant ce lancement. l'interruption ayant lieu au moins une demi-seconde après le début du chrono.
    Vous me direz si vous préférez que je poste des morceaux de code dans le corps du message.

    Merci d'avance

    -----
    Dernière modification par gienas ; 10/03/2016 à 11h50. Motif: Supprimé le zip devenu inutile

  2. #2
    invite1d577638

    Re : Petit projet Arduino

    Salut,

    Poste :
    - ton code complet (entre balises CODE histoire de faciliter la lecture)
    - le schéma de tout tes branchements

  3. #3
    invite9ddae0fb

    Re : Petit projet Arduino

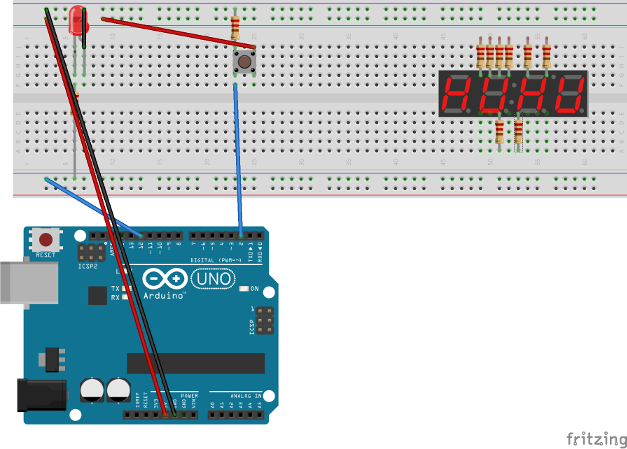
    Le code est un peu long, je n'ai pas utilisé la bilibothèque sevseg.h, je crois qu'elle n'etait pas adaptée à mon afficheur 16 broches. Pour le shéma, certains vont sûrement être horrifiés, le cablâge pour l'afficheur correspond à ce qu'il y a dans le code.Nom : schema_cablage_bb.png
Affichages : 116
Taille : 151,9 Ko
    Code:
    int led = 12;
    const int relaisPin = 13;
    const int buttonPin = 2;
    int state = LOW;  // the current state of the output pin
    int reading;  // the current reading from the input pin
    int previous = LOW; // the previous reading from the input pin
    //declare the LCD screen
    int digit1 = 11; //PWM Display pin 1
    int digit2 = 10; //PWM Display pin 2
    int digit3 = 9; //PWM Display pin 6
    int digit4 = 6; //PWM Display pin 8
    
    //Pin mapping from Arduino to the ATmega DIP28 if you need it
    //http://www.arduino.cc/en/Hacking/PinMapping
    int segA = A1; //Display pin 14
    int segB = 3; //Display pin 16
    int segC = 4; //Display pin 13
    int segD = 5; //Display pin 3
    int segE = A0; //Display pin 5
    int segF = 7; //Display pin 11
    int segG = 8; //Display pin 15
    
    // the follow variables are long's because the time, measured in miliseconds,
    // will quickly become a bigger number than can be stored in an int.
    long timeWait = 700;
    long time = 0;         // the last time the output pin was toggled
    long debounce = 200;   // the debounce time, increase if the output flickers
    long lastDebounceTime = 500;
    
    void setup()
    {
      // initialize serial communications at 9600 bps:
      Serial.begin(9600); 
      //initialize led, relay and button
      pinMode(led, OUTPUT);     
      pinMode(relaisPin,OUTPUT);
      pinMode(buttonPin, INPUT);
      //initialize LCD screen
       pinMode(segA, OUTPUT);
      pinMode(segB, OUTPUT);
      pinMode(segC, OUTPUT);
      pinMode(segD, OUTPUT);
      pinMode(segE, OUTPUT);
      pinMode(segF, OUTPUT);
      pinMode(segG, OUTPUT);
    
      pinMode(digit1, OUTPUT);
      pinMode(digit2, OUTPUT);
      pinMode(digit3, OUTPUT);
      pinMode(digit4, OUTPUT);
      
      pinMode(13, OUTPUT);
    }
    void loop() {
      
    
      reading = digitalRead(buttonPin);
      // if the input just went from LOW and HIGH and we've waited long enough
      // to ignore any noise on the circuit, toggle the output pin and remember
      // the time
      if (reading == HIGH && previous == LOW && millis() - time > debounce) {
        if (state == HIGH){
          Serial.println(reading);
          lastDebounceTime = millis();
          for (timeWait; timeWait>0;timeWait--){
              displayNumber(timeWait);
              
               if (reading != previous && millis() - lastDebounceTime > debounce) {
                 break;
                 displayNumber(timeWait);//partie qui ne fonctionne pas, la boucle "for", sans ce "if" et "break", fonctionne
               }
          }
          state = LOW;
    
        }
        else
          state = HIGH;
        time = millis();    
      }
      digitalWrite(led, state);
      digitalWrite(relaisPin, state);
      timeWait = 700;
      
      previous = reading;
    
    }
    
    
    //Given a number, we display 10:22
    //After running through the 4 numbers, the display is left turned off
    
    //Display brightness
    //Each digit is on for a certain amount of microseconds
    //Then it is off until we have reached a total of 20ms for the function call
    //Let's assume each digit is on for 1000us
    //If each digit is on for 1ms, there are 4 digits, so the display is off for 16ms.
    //That's a ratio of 1ms to 16ms or 6.25% on time (PWM).
    //Let's define a variable called brightness that varies from:
    //5000 blindingly bright (15.7mA current draw per digit)
    //2000 shockingly bright (11.4mA current draw per digit)
    //1000 pretty bright (5.9mA)
    //500 normal (3mA)
    //200 dim but readable (1.4mA)
    //50 dim but readable (0.56mA)
    //5 dim but readable (0.31mA)
    //1 dim but readable in dark (0.28mA)
    
    void displayNumber(int toDisplay) {
    #define DISPLAY_BRIGHTNESS  100
    
    #define DIGIT_ON  HIGH
    #define DIGIT_OFF  LOW
    
      long beginTime = millis();
    
      for(int digit = 4 ; digit > 0 ; digit--) {
    
        //Turn on a digit for a short amount of time
        switch(digit) {
        case 1:
          digitalWrite(digit1, DIGIT_ON);
          break;
        case 2:
          digitalWrite(digit2, DIGIT_ON);
          break;
        case 3:
          digitalWrite(digit3, DIGIT_ON);
          break;
        case 4:
          digitalWrite(digit4, DIGIT_ON);
          break;
        }
    
        //Turn on the right segments for this digit
        lightNumber(toDisplay % 10);
        toDisplay /= 10;
    
        delayMicroseconds(DISPLAY_BRIGHTNESS); //Display this digit for a fraction of a second (between 1us and 5000us, 500 is pretty good)
    
        //Turn off all segments
        lightNumber(10); 
    
        //Turn off all digits
        digitalWrite(digit1, DIGIT_OFF);
        digitalWrite(digit2, DIGIT_OFF);
        digitalWrite(digit3, DIGIT_OFF);
        digitalWrite(digit4, DIGIT_OFF);
      }
    
      while( (millis() - beginTime) < 10) ; //Wait for 20ms to pass before we paint the display again
    }
    
    //Given a number, turns on those segments
    //If number == 10, then turn off number
    void lightNumber(int numberToDisplay) {
    
    #define SEGMENT_ON  LOW
    #define SEGMENT_OFF HIGH
    
      switch (numberToDisplay){
    
      case 0:
        digitalWrite(segA, SEGMENT_ON);
        digitalWrite(segB, SEGMENT_ON);
        digitalWrite(segC, SEGMENT_ON);
        digitalWrite(segD, SEGMENT_ON);
        digitalWrite(segE, SEGMENT_ON);
        digitalWrite(segF, SEGMENT_ON);
        digitalWrite(segG, SEGMENT_OFF);
        break;
    
      case 1:
        digitalWrite(segA, SEGMENT_OFF);
        digitalWrite(segB, SEGMENT_ON);
        digitalWrite(segC, SEGMENT_ON);
        digitalWrite(segD, SEGMENT_OFF);
        digitalWrite(segE, SEGMENT_OFF);
        digitalWrite(segF, SEGMENT_OFF);
        digitalWrite(segG, SEGMENT_OFF);
        break;
    
      case 2:
        digitalWrite(segA, SEGMENT_ON);
        digitalWrite(segB, SEGMENT_ON);
        digitalWrite(segC, SEGMENT_OFF);
        digitalWrite(segD, SEGMENT_ON);
        digitalWrite(segE, SEGMENT_ON);
        digitalWrite(segF, SEGMENT_OFF);
        digitalWrite(segG, SEGMENT_ON);
        break;
    
      case 3:
        digitalWrite(segA, SEGMENT_ON);
        digitalWrite(segB, SEGMENT_ON);
        digitalWrite(segC, SEGMENT_ON);
        digitalWrite(segD, SEGMENT_ON);
        digitalWrite(segE, SEGMENT_OFF);
        digitalWrite(segF, SEGMENT_OFF);
        digitalWrite(segG, SEGMENT_ON);
        break;
    
      case 4:
        digitalWrite(segA, SEGMENT_OFF);
        digitalWrite(segB, SEGMENT_ON);
        digitalWrite(segC, SEGMENT_ON);
        digitalWrite(segD, SEGMENT_OFF);
        digitalWrite(segE, SEGMENT_OFF);
        digitalWrite(segF, SEGMENT_ON);
        digitalWrite(segG, SEGMENT_ON);
        break;
    
      case 5:
        digitalWrite(segA, SEGMENT_ON);
        digitalWrite(segB, SEGMENT_OFF);
        digitalWrite(segC, SEGMENT_ON);
        digitalWrite(segD, SEGMENT_ON);
        digitalWrite(segE, SEGMENT_OFF);
        digitalWrite(segF, SEGMENT_ON);
        digitalWrite(segG, SEGMENT_ON);
        break;
    
      case 6:
        digitalWrite(segA, SEGMENT_ON);
        digitalWrite(segB, SEGMENT_OFF);
        digitalWrite(segC, SEGMENT_ON);
        digitalWrite(segD, SEGMENT_ON);
        digitalWrite(segE, SEGMENT_ON);
        digitalWrite(segF, SEGMENT_ON);
        digitalWrite(segG, SEGMENT_ON);
        break;
    
      case 7:
        digitalWrite(segA, SEGMENT_ON);
        digitalWrite(segB, SEGMENT_ON);
        digitalWrite(segC, SEGMENT_ON);
        digitalWrite(segD, SEGMENT_OFF);
        digitalWrite(segE, SEGMENT_OFF);
        digitalWrite(segF, SEGMENT_OFF);
        digitalWrite(segG, SEGMENT_OFF);
        break;
    
      case 8:
        digitalWrite(segA, SEGMENT_ON);
        digitalWrite(segB, SEGMENT_ON);
        digitalWrite(segC, SEGMENT_ON);
        digitalWrite(segD, SEGMENT_ON);
        digitalWrite(segE, SEGMENT_ON);
        digitalWrite(segF, SEGMENT_ON);
        digitalWrite(segG, SEGMENT_ON);
        break;
    
      case 9:
        digitalWrite(segA, SEGMENT_ON);
        digitalWrite(segB, SEGMENT_ON);
        digitalWrite(segC, SEGMENT_ON);
        digitalWrite(segD, SEGMENT_ON);
        digitalWrite(segE, SEGMENT_OFF);
        digitalWrite(segF, SEGMENT_ON);
        digitalWrite(segG, SEGMENT_ON);
        break;
    
      case 10:
        digitalWrite(segA, SEGMENT_OFF);
        digitalWrite(segB, SEGMENT_OFF);
        digitalWrite(segC, SEGMENT_OFF);
        digitalWrite(segD, SEGMENT_OFF);
        digitalWrite(segE, SEGMENT_OFF);
        digitalWrite(segF, SEGMENT_OFF);
        digitalWrite(segG, SEGMENT_OFF);
        break;
      }
    }

  4. #4
    invite1d577638

    Re : Petit projet Arduino

    Ce n'est pas un schéma ça, c'est une jolie image faite avec Frizting qui est incompréhensible. Change d'onglet !

    Tu parles de relais dans ton premier message, il est où ?

    PS : décrit simplement ce que tu veux que ton programme fasse, c'est pas très clair.

  5. A voir en vidéo sur Futura
  6. #5
    invite9ddae0fb

    Réinventer la roue

    Si vous avez des suggestions c'est très bien. J'ai trouvé ça : https://skyduino.wordpress.com/2012/...s-avec-buzzer/

  7. #6
    invite1d577638

    Re : Réinventer la roue

    ça ne répond pas à mes questions...

  8. #7
    invite9ddae0fb

    Re : Petit projet Arduino

    Un peu d'indulgence stp, c'était la première fois que je faisais ça. Et puis faut pas s'affoler, il ne s'agit que d'un bouton, une led et un écran. Le fait qu'il y ai un relais, et même peut-être un écran ne change rien à la question. Désolé si j'ai du mal à m'expliquer simplement, je sais que ça n'était pas très clair.

    Un push, la lumière s'allume; 2e push, chrono puis la lumière s'éteint; 3e push, interruption du chrono avec possibilité de le relancer ou non.

  9. #8
    invite1d577638

    Re : Petit projet Arduino

    J'ai un peu de mal à comprendre ton code, mais un truc pas logique est que tu ne relis pas l'état de ton bouton au moment où tu fais ton if (en rouge dans ton code). C'est peut-être ça le problème...?

    Rajoute un reading = digitalRead(buttonPin); dans la boucle, avant ladite condition.

  10. #9
    Seb.26

    Re : Petit projet Arduino

    Mets des parenthèse dans ton if ...
    << L'histoire nous apprend que l'on apprend rien de l'histoire. >>

  11. #10
    Seb.26

    Re : Petit projet Arduino

    la première partie du for ne sert à rien, il manque probablement un truc genre "timeWait=100"
    << L'histoire nous apprend que l'on apprend rien de l'histoire. >>

  12. #11
    Seb.26

    Re : Petit projet Arduino

    le code après le break n'est probablement pas exécuté ... voir la doc de ton langage ...
    << L'histoire nous apprend que l'on apprend rien de l'histoire. >>

  13. #12
    invite9ddae0fb

    Unhappy Re : Petit projet Arduino

    Merci Yoruk, lire l'état du bouton dans la boucle résout le problème. Le compteur s'interrompt.

    Je crois que j'ai du mal à comprendre la logique du switch et... de la programmation en général.

    Merci Seb56, du coup c'est résolu, je vais pouvoir avoir des nuits sereines.

  14. #13
    invite1d577638

    Re : Petit projet Arduino

    Cool si ça marche.

    Citation Envoyé par cedrick56 Voir le message
    Je crois que j'ai du mal à comprendre la logique du switch et... de la programmation en général.
    Etudie les exemples dispos sur le site arduino, les bouts de code sont courts et simples à comprendre !

Discussions similaires

  1. Projet ARDUINO
    Par invite9e8b2371 dans le forum Électronique
    Réponses: 6
    Dernier message: 03/02/2014, 21h59
  2. Projet arduino
    Par invite17b3def6 dans le forum Électronique
    Réponses: 0
    Dernier message: 26/11/2012, 17h52
  3. Projet arduino
    Par invite6b4f2e28 dans le forum Électronique
    Réponses: 6
    Dernier message: 16/09/2012, 23h53
  4. petit projet de rénovation de toiture, beaucoup de question, petit budget !
    Par invitebc3b090b dans le forum Habitat bioclimatique, isolation et chauffage
    Réponses: 0
    Dernier message: 04/04/2012, 23h23
  5. Petit projet de domotique carte arduino + relais 220v
    Par invite52d12a2f dans le forum Électronique
    Réponses: 9
    Dernier message: 04/04/2012, 15h11
Dans la rubrique Tech de Futura, découvrez nos comparatifs produits sur l'informatique et les technologies : imprimantes laser couleur, casques audio, chaises gamer...